- Regular inspections and maintenance prevent small issues from becoming costly breakdowns.
- Dirty filters, worn components, and thermostat problems are the most common causes of system failures.
- Minor repairs, like cleaning filters, clearing vents, and checking thermostats, can often be handled safely at home.
- Professional inspections are essential for complex issues such as refrigerant leaks, electrical problems, or damaged heat exchangers.
- Preparing HVAC systems for seasonal changes—summer cooling and winter heating—ensures optimal performance and avoids unexpected failures.
- Energy-saving upgrades and proper airflow management improve efficiency, reduce strain on the system, and extend its lifespan.
Heating and air conditioning systems are the backbone of home comfort, keeping you warm in the winter and cool in the summer. But like any mechanical system, HVAC units can experience issues over time. Learning how to repair heating and air conditioning—and more importantly, how to prevent future breakdowns—can save you money, stress, and the headache of unexpected repairs.
Whether you’re a DIY enthusiast or just looking to understand your system better, this guide will walk you through practical repairs, preventative maintenance, and tips to maximize your HVAC system’s lifespan.
Why Your HVAC System Breaks Down
Have you ever wondered why your heating or cooling suddenly stops working? HVAC systems are built to handle daily use, but several underlying issues can cause them to fail unexpectedly. Understanding these causes not only helps with repairs but also gives you insight into preventing future breakdowns.
Dirty filters and vents:
Dust, pollen, pet hair, and household debris accumulate in your system over time. When filters become clogged, airflow is restricted, forcing your furnace or air conditioner to work harder to push air through the system. This constant strain can overheat components, reduce efficiency, and even cause your system to shut down as a safety precaution. Dirty vents also contribute to inconsistent temperatures throughout the home.
Wear and tear:
Every HVAC system has moving parts—belts, motors, bearings, fans, compressors—and each of these components can degrade with regular use. Belts can loosen or crack, blower motors can slow down, and compressors may lose power over time. Even well-maintained systems eventually experience mechanical fatigue, making regular inspections essential.
Thermostat issues:
Your thermostat acts as the communication center between your living space and the HVAC system. If it’s miscalibrated, incorrectly programmed, or malfunctioning, it can cause your system to run longer than necessary or fail to turn on at all. Outdated thermostats may also send inaccurate temperature readings, leading to unnecessary cycles and wasted energy.
Refrigerant problems:
Air conditioners rely on refrigerant to absorb and release heat. If levels drop due to leaks or improper charging, your AC loses cooling capacity and the compressor must work overtime. Running a system low on refrigerant can damage the compressor, creating one of the most expensive HVAC repairs. Leaks also pose environmental concerns and require a licensed professional to fix.
Electrical failures:
HVAC systems depend on correct voltage and stable electrical connections. Loose wires, corroded terminals, failing capacitors, or blown fuses can prevent the system from powering on or cause it to shut off mid-cycle. Electrical issues are often subtle at first—intermittent operation, flickering displays—but can quickly escalate into complete system failure or safety hazards.
Understanding the root cause of a breakdown is the first step to proper repair and prevention. The more familiar you become with how your system behaves, the easier it is to spot potential failures early.
How Can You Identify Problems Early?
Spotting issues early can save you from costly repairs later. HVAC systems usually show symptoms before they completely fail, and recognizing these warning signs gives you the opportunity to address problems while they’re still small.
- Unusual noises such as banging, squealing, or rattling: These sounds can point to loose components, failing fan belts, debris inside the blower, or even motor problems. Louder or worsening noises often indicate a part that’s close to failing.
- Strange odors: Burning smells may indicate electrical issues or overheating parts. Musty odors often signal mold in ducts or around evaporator coils. A persistent chemical-like smell could point to refrigerant leaks—something that should never be ignored.
- Uneven heating or cooling across rooms: This often happens when there are airflow obstructions, duct leaks, malfunctioning dampers, or problems with the blower motor. It may also indicate thermostat misplacement, especially if it’s located near a heat source or draft.
- Sudden spikes in energy bills: When your system is overworked due to clogged filters, low refrigerant, aging components, or thermostat problems, it consumes more energy to maintain your desired indoor temperature. A noticeable jump in utility costs is often one of the earliest signs that something is wrong.
- Frequent cycling on and off: Short cycling can occur when the system overheats, experiences airflow issues, or suffers from faulty sensors. Over time, this constant starting and stopping adds unnecessary wear to the system and shortens its lifespan.
Regular inspections can help catch small problems before they become major failures. Even a quick monthly check of filters, vents, and thermostat settings can make a big difference.
5 Basic Repairs You Can Handle Yourself
Not every HVAC problem requires a professional. Some minor repairs and adjustments can be safely handled at home. Addressing these issues early can prevent bigger problems and extend the life of your system. Here are the most common DIY-friendly HVAC tasks:
1. Replacing or Cleaning Air Filters
Air filters trap dust, pollen, and debris to protect your HVAC system and improve indoor air quality. Keeping them clean ensures efficient airflow and prevents strain on your system.
Steps to replace or clean filters:
- Turn off your HVAC system before handling the filter.
- Slide out the old disposable filter or remove the reusable one.
- Replace with a new filter or wash the reusable one according to manufacturer instructions.
- Ensure the filter is oriented correctly, following the airflow arrows on the frame.
- Check the filter monthly and repeat the process every 1–3 months as needed.
2. Clearing Air Vents and Ducts
Blocked vents can reduce airflow, create uneven temperatures, and force your system to work harder. Cleaning vents and checking duct access points helps maintain consistent heating and cooling.
Steps to clear vents and ducts:
- Remove furniture, rugs, or curtains that block supply and return vents.
- Use a vacuum with a brush attachment to clean visible dust and debris from vents.
- Inspect exposed ductwork for dust buildup and wipe down if accessible.
- Ensure all vents are open and unobstructed to maintain even airflow.
3. Checking the Thermostat
The thermostat controls your HVAC system’s operation, and small issues here can impact your entire home’s comfort. Checking calibration and settings helps prevent unnecessary cycling.
Steps to check the thermostat:
- Verify the thermostat is set to the correct mode (heating or cooling) for the season.
- Replace batteries if the display is dim or unresponsive.
- For digital or smart thermostats, ensure firmware is up to date.
- Consider upgrading old thermostats to programmable or smart models for better efficiency.
4. Tightening Electrical Connections
Loose or corroded electrical connections can cause intermittent operation or prevent the system from starting. Tightening these connections improves reliability and safety.
Steps to tighten connections:
- Turn off power to the HVAC unit before opening panels.
- Inspect wiring for loose screws, discoloration, or corrosion.
- Carefully tighten screws and terminals without overtightening.
- Ensure no wires are frayed or damaged; replace if needed.
5. Lubricating Moving Parts
HVAC motors and fans contain bearings and moving components that benefit from lubrication. Properly lubricated parts reduce friction, noise, and premature wear.
Steps to lubricate moving parts:
- Consult your system manual to locate lubrication points and recommended lubricant type.
- Apply a small amount of approved oil or grease to motors, bearings, and fans.
- Avoid over-lubricating, which can attract dust and debris.
- Operate the system briefly to ensure parts move smoothly.
When to Call a Professional
While DIY fixes are useful, some issues require expert attention:
- Refrigerant leaks
- Compressor or fan motor failure
- Major electrical problems
- Persistent water leaks
- Complex ductwork issues
Attempting to repair these components without proper training can be dangerous and may void warranties.
How to Maintain Your Heating System
Just like your air conditioner, your heating system needs regular care to stay efficient and reliable. Proper maintenance reduces strain on components, enhances safety, and ensures your home stays warm when temperatures drop. Here’s how to keep your heating system running smoothly:
- Inspect the furnace filter: Check it monthly and replace or clean it as needed to maintain airflow and prevent strain on the blower motor.
- Clean the blower assembly: Gently vacuum around the blower wheel and motor to remove dust that can cause overheating and reduce efficiency.
- Check the burner flames: A steady blue flame indicates proper operation. Yellow or flickering flames may signal combustion problems or carbon monoxide risks.
- Inspect and clean the heat exchanger: Look for soot buildup, corrosion, or signs of wear. Professional inspections are recommended for safety.
- Test the thermostat for heating mode: Switch to heating mode before winter to ensure the system responds quickly and delivers warm air.
- Check and clear the exhaust vent: Remove leaves, twigs, nests, and other obstructions from the exterior vent to allow proper ventilation.
- Lubricate furnace bearings and moving parts: Older furnaces may require lubrication to reduce friction and extend the life of components.
- Inspect ductwork for heat loss: Look for gaps, disconnections, or damaged insulation. Sealing ducts improves comfort and reduces energy waste.
Regular heating maintenance not only boosts performance but also helps prevent unexpected breakdowns during the coldest months. If anything appears damaged, worn, or unsafe, a professional inspection is always the safest choice.
Tips to Maintain Your AC Unit

One of the most important parts of your HVAC system is the air conditioner. Here’s how to maintain your AC unit effectively:
- Clean the condenser coils: Dust, pollen, leaves, and debris can accumulate on the coils over time and reduce efficiency. Use a soft brush or garden hose to remove buildup, and make sure to clear the area around the unit to allow proper airflow.
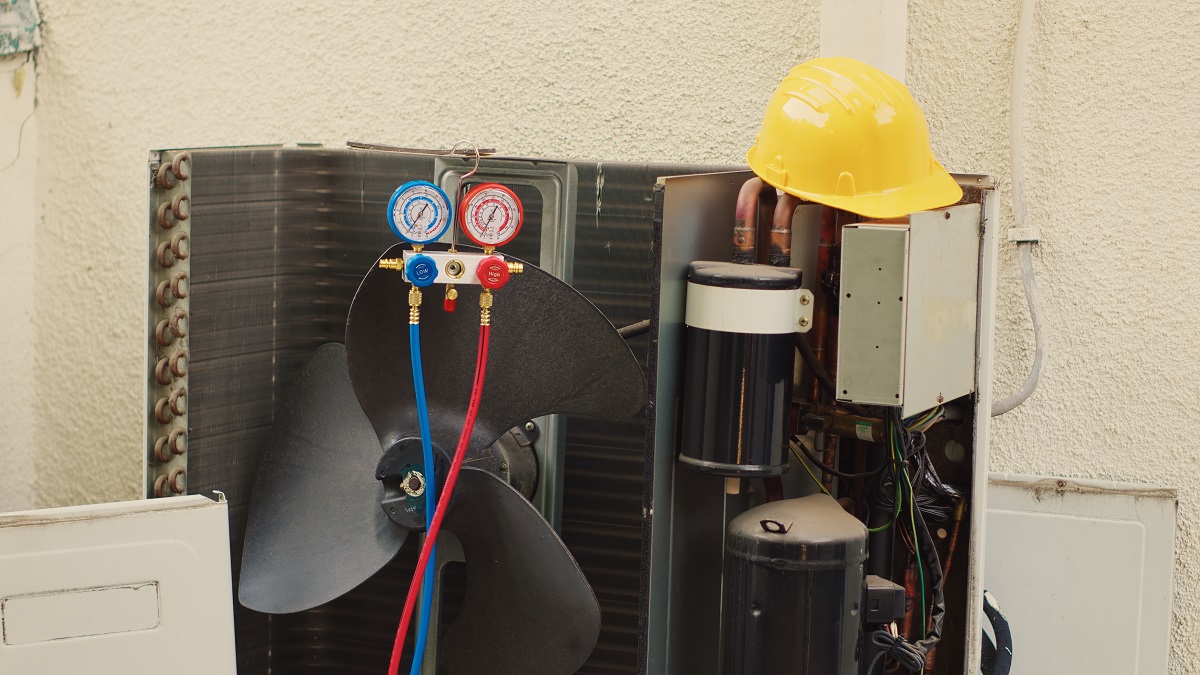
- Inspect refrigerant lines: Check for signs of leaks, cracks, or worn insulation along the refrigerant lines. Damaged lines can reduce cooling performance and put extra strain on the compressor. Call a professional if you notice any issues.
- Check the condenser fan: Ensure the fan blades spin freely without obstructions, dirt, or debris. A malfunctioning fan can reduce airflow, cause the system to overheat, and lead to costly repairs.
- Schedule seasonal tune-ups: Before summer hits, have a technician inspect the system to check refrigerant levels, clean internal components, and test overall performance. Regular tune-ups help catch minor problems before they turn into major breakdowns.
Taking these steps ensures your AC performs optimally and avoids mid-summer breakdowns.
How to Boost Home Heating and Cooling Efficiency
Efficiency isn’t just about comfort—it’s about saving energy, reducing costs, and minimizing wear on your HVAC system. There are several practical steps you can take to improve home heating and cooling efficiency:
- Seal gaps around windows, doors, and ductwork to prevent heat or cold loss: Even small cracks or leaks can cause your HVAC system to work harder to maintain consistent temperatures. Use weatherstripping, caulk, or duct tape to seal these gaps and improve overall performance.
- Add insulation to attics and walls: Proper insulation helps keep warm air inside during winter and cool air inside during summer. Upgrading insulation reduces the load on your heating and cooling systems and helps maintain more consistent indoor temperatures.
- Use programmable thermostats to reduce unnecessary heating or cooling: Setting your thermostat to adjust automatically when you’re away or asleep can prevent energy waste while keeping your home comfortable. Smart thermostats can also learn your schedule and optimize energy use even further.
- Consider energy-efficient HVAC upgrades like high SEER AC units or smart thermostats: Upgrading to more efficient systems or components reduces energy consumption, lowers utility bills, and can enhance overall comfort throughout your home.
Small changes like these can lead to significant savings while keeping your home cozy or cool, and they allow you to prioritize HVAC energy conservation as part of your long-term maintenance and efficiency strategy.
Preparing Your AC for Summer
Summer is when air conditioners face their biggest challenges, and a little preparation can prevent mid-season breakdowns and costly repairs. To get your AC ready for summer:
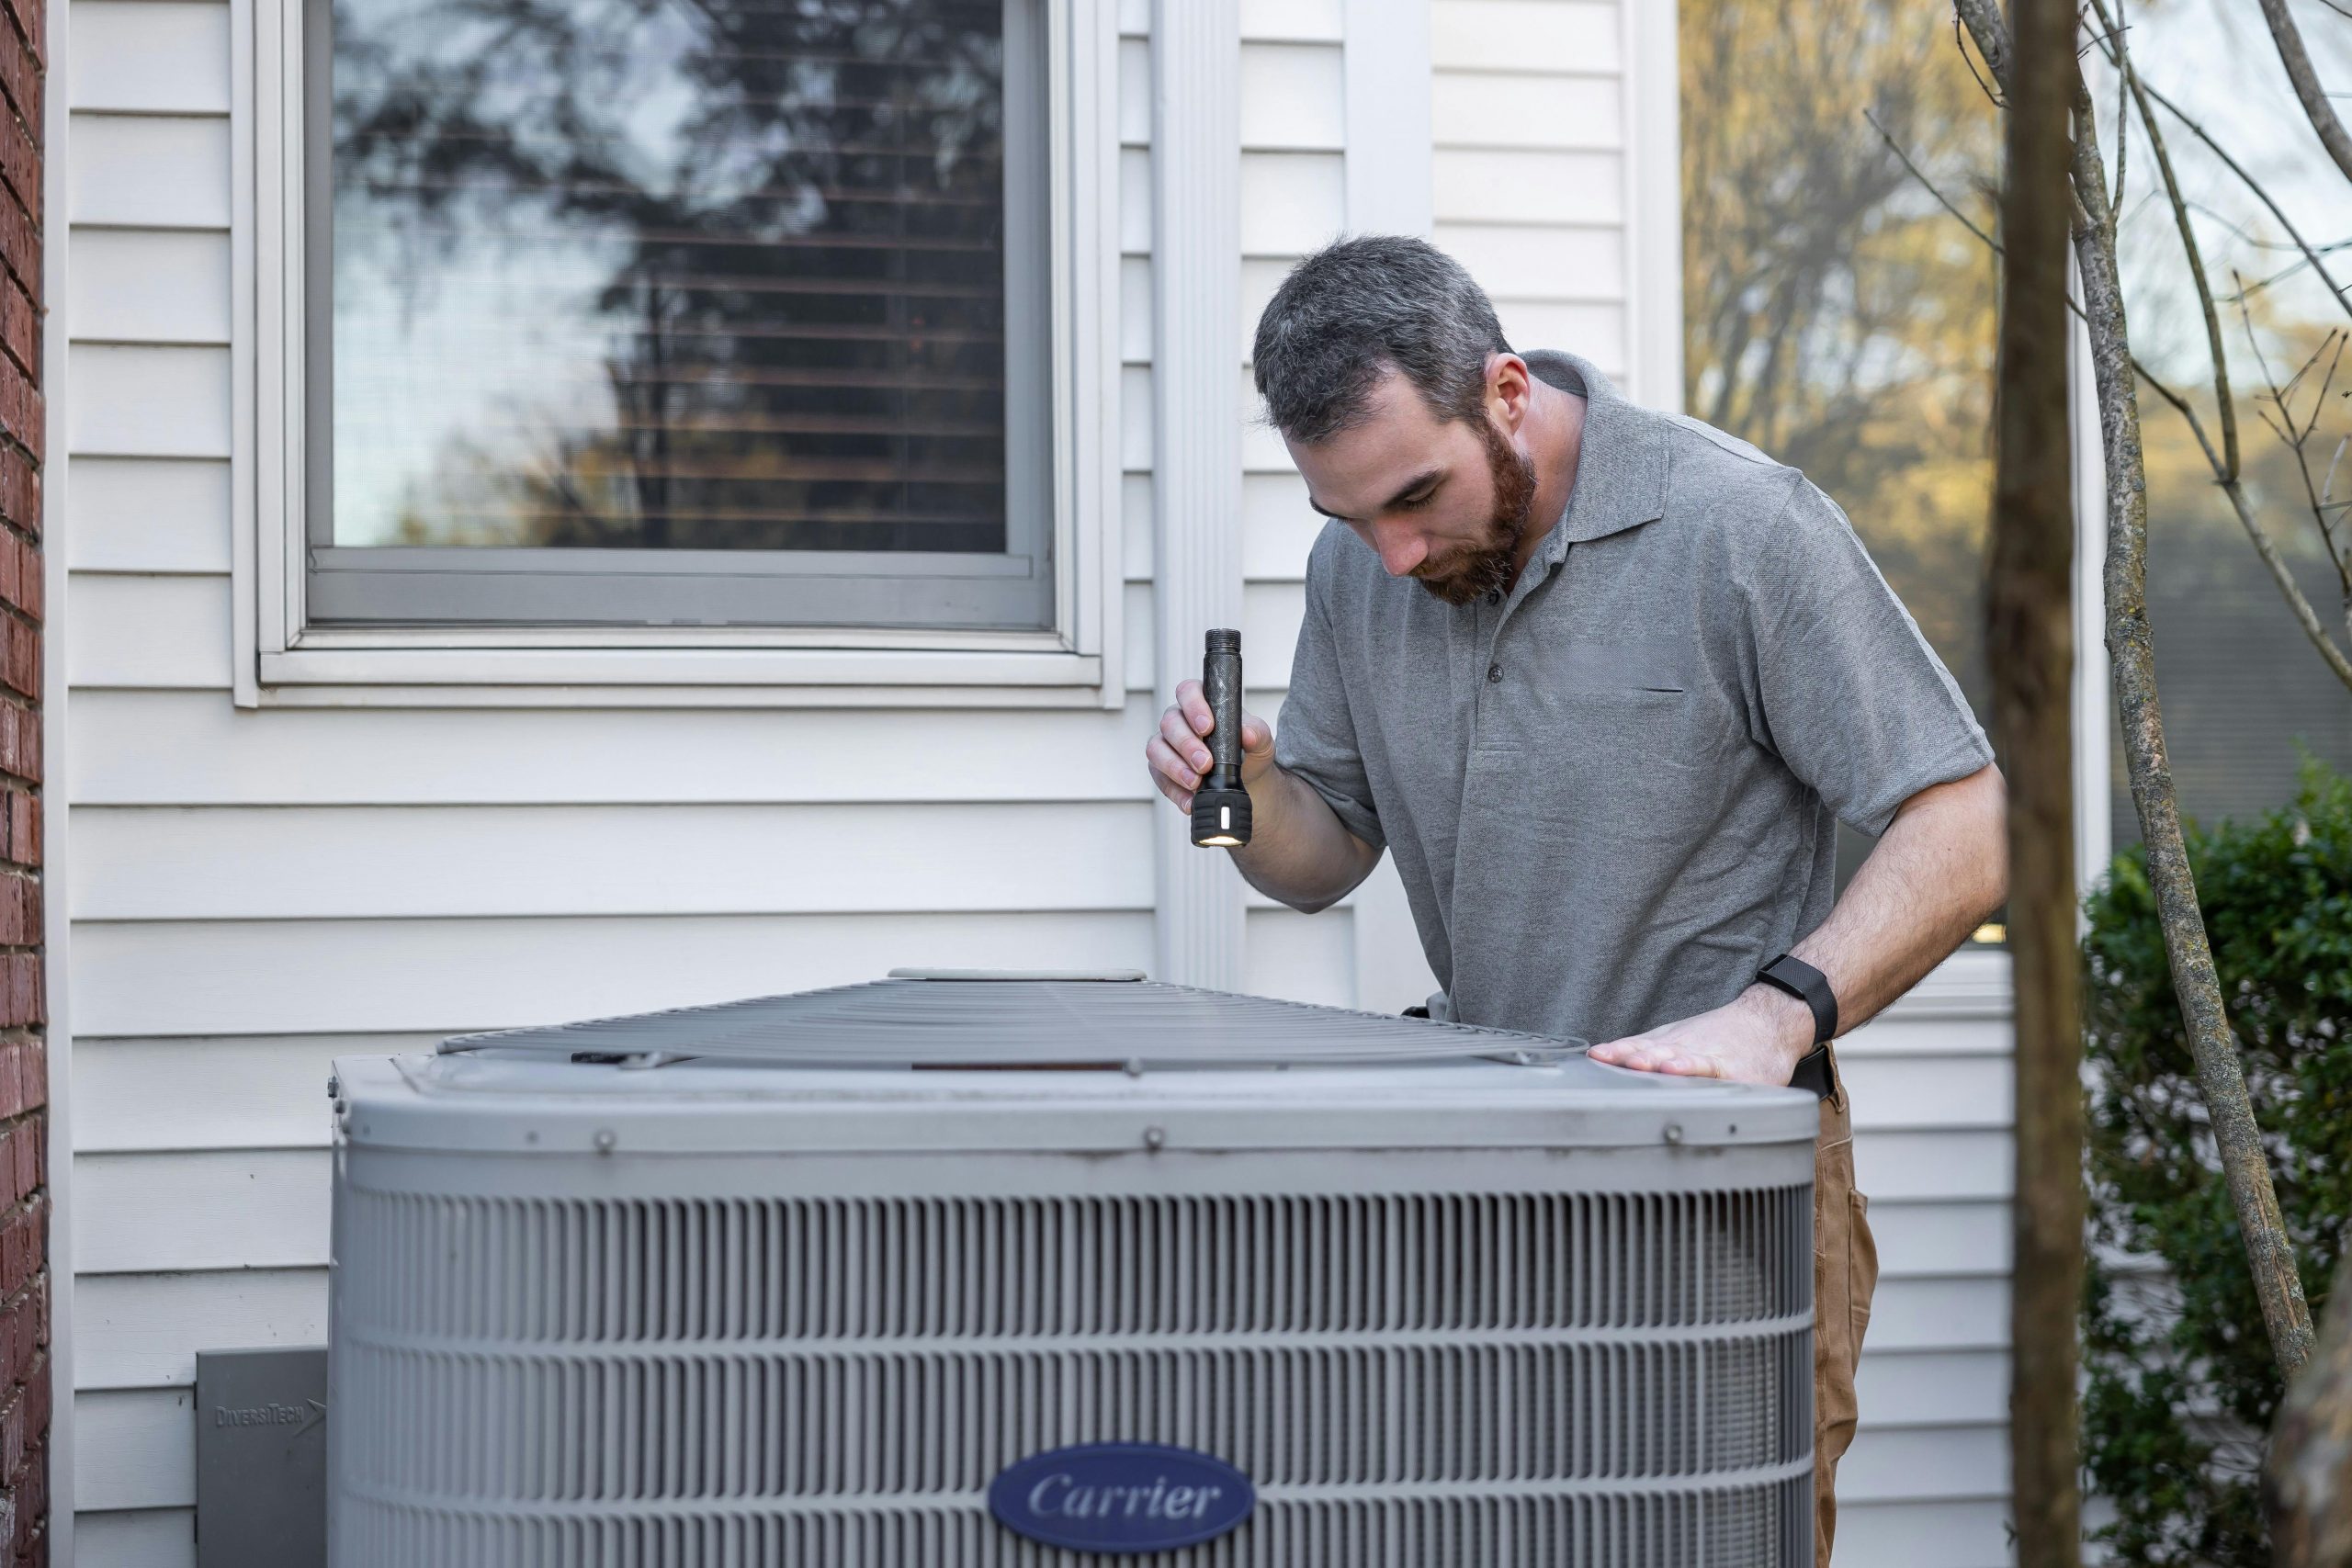
- Inspect and clean the outdoor unit: Remove dirt, leaves, and debris from the condenser coils and surrounding area. Clean coils allow your system to release heat efficiently, which improves cooling performance and reduces energy use.
- Ensure refrigerant levels are adequate: Low refrigerant can reduce cooling capacity and strain the compressor. Check for leaks, and have a professional refill the system if necessary to maintain optimal operation.
- Remove debris and trim vegetation around the unit: Keep plants, shrubs, and grass at least two feet away from the outdoor unit to ensure proper airflow. Obstructions can make the system work harder, decreasing efficiency and increasing wear.
- Test airflow and temperature output in each room: Turn on the system and verify that all rooms are receiving consistent cooling. Uneven temperatures may indicate blocked vents, duct leaks, or other airflow issues that need attention.
- Schedule a professional inspection if your system hasn’t been serviced in over a year: A technician can clean internal components, check electrical connections, inspect the refrigerant system, and identify potential issues before they become major problems.
Preparing Your Heating System for Cold Weather
Cold weather puts your heating system to the test, so preparing it ahead of time is one of the best ways to avoid mid-winter breakdowns. Here are the essential tasks to complete before winter arrives:
- Replace the filter: A clean filter allows better airflow and reduces strain on the blower motor.
- Inspect the thermostat: Make sure it’s functioning correctly and maintaining accurate temperatures.
- Clean inside and around the furnace: Dust, debris, and clutter can interfere with operation or create safety hazards.
- Check the pilot light or ignition system: Weak or inconsistent ignition can cause startup issues or prevent heating entirely.
- Inspect ductwork for leaks: Heat loss through ducts forces your system to work harder and increases energy bills.
- Test the heating cycle: Turn on the system early in the season to ensure warm air flows properly through all vents.
- Clear the exhaust flue: Blockages can restrict airflow and create dangerous carbon monoxide buildup.
Energy-Saving Upgrades That Pay Off
Investing in smart upgrades can prevent breakdowns and reduce costs:
- Programmable or smart thermostats
- High-efficiency air filters and air purifiers
- Zoned heating and cooling systems
- Duct insulation and sealing
- Energy-efficient furnaces or AC units
Not only do these upgrades improve performance, but they also extend the life of your system.
When Repairs Aren’t Enough: Knowing When to Replace
Sometimes, repairs are only temporary solutions. Consider replacement if:
- Your system is over 10-15 years old
- Frequent breakdowns occur despite maintenance
- Energy bills keep rising
- Major components like compressors or heat exchangers fail
A new, energy-efficient system can be more cost-effective over time than repeated repairs.
Final Thoughts
Learning how to repair heating and air conditioning and prevent future breakdowns isn’t just about fixing problems—it’s about maintaining comfort, safety, and efficiency in your home. By combining DIY fixes, preventive maintenance, professional inspections, and smart energy practices, you can enjoy a reliable HVAC system year-round.
With the right approach, you’ll reduce stress, save money, and avoid the frustration of unexpected system failures. Start with small maintenance habits today, and your home will stay comfortable tomorrow.